
-
-
Just a heads up, at Red Hat Summit this year I’ll be co-presenting a session with Andy Block. The presentation is on Wednesday, April 16 from 3:40 pm – 4:40 pm.
JBoss In The Trenches
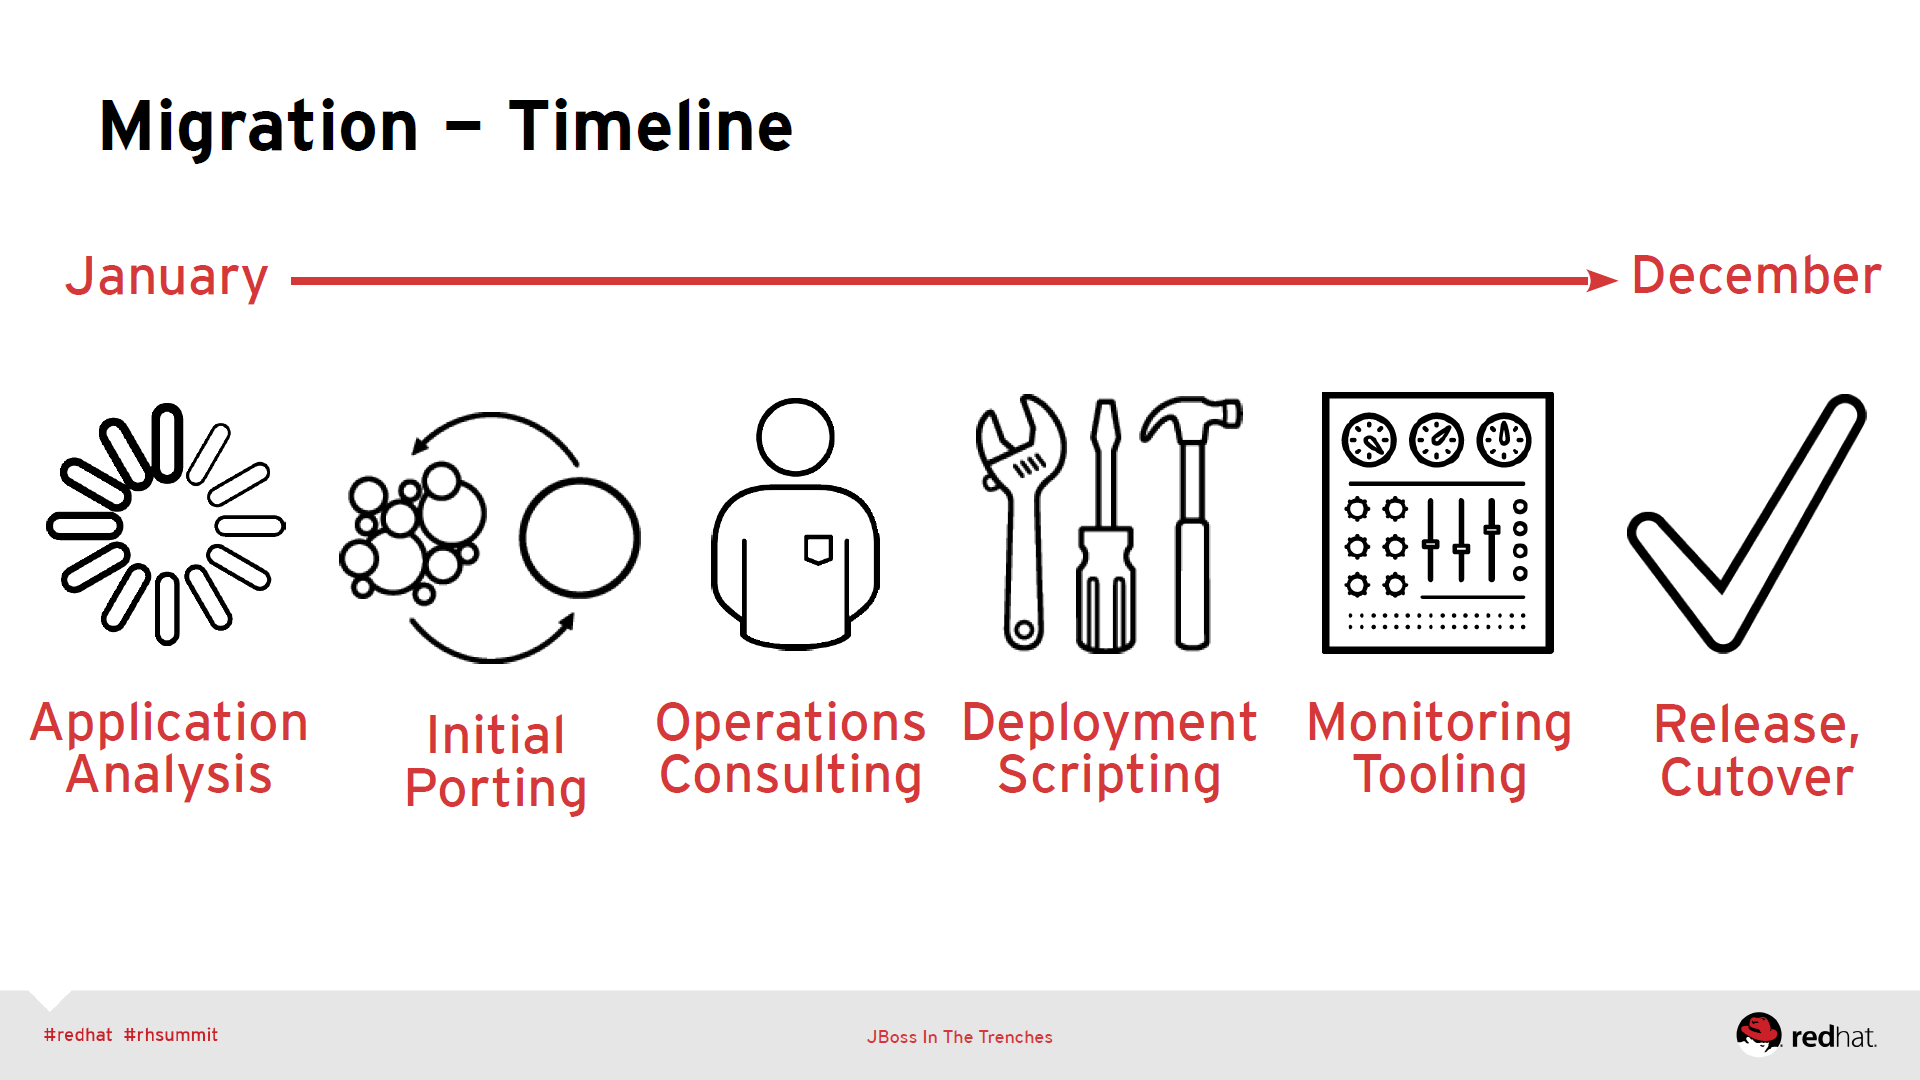
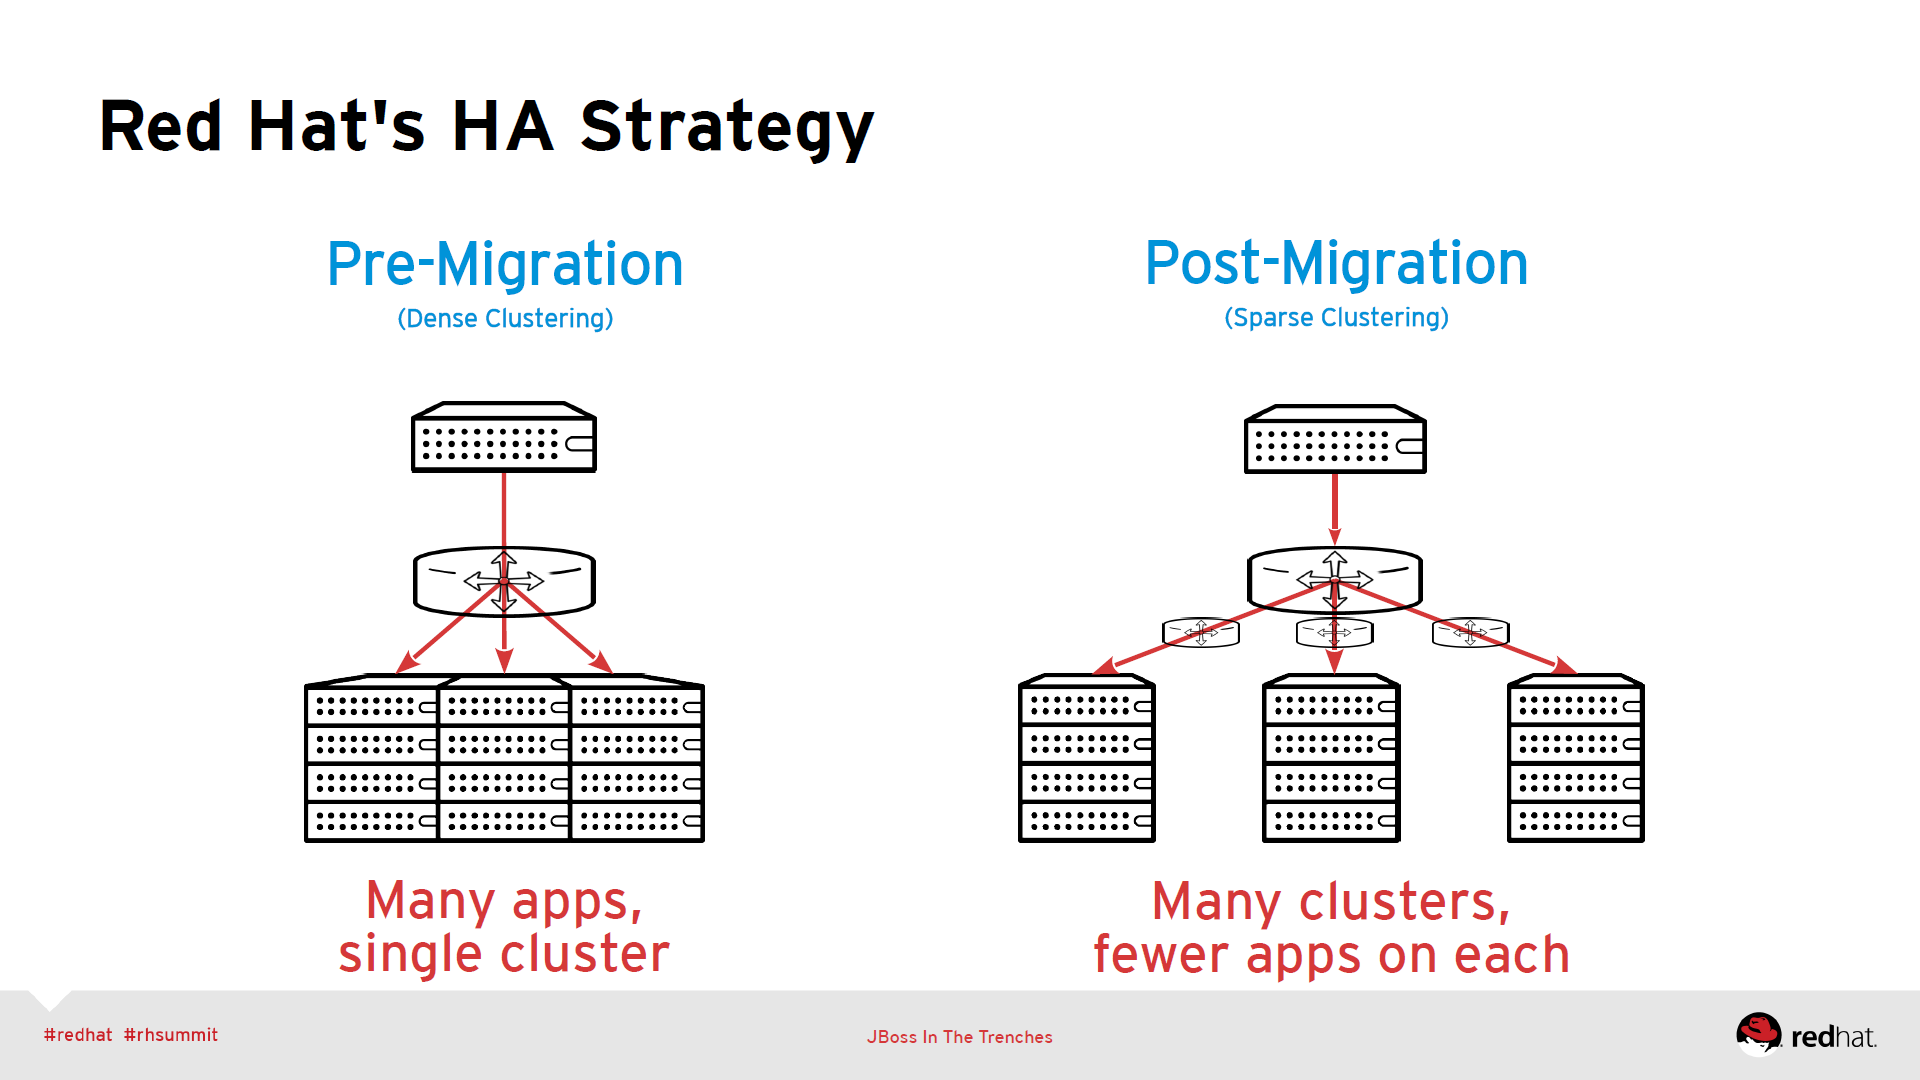
In this session (my first time presenting at a conference! w00t!) we’ll be going over the enormous year-long migration from JBoss EAP 4/5 to 6.1 we undertook last year in RH IT. As we move through the different stages of the migration we’ll introduce you to industry best practices and implementation decisions to consider when deploying EAP6 clusters. Here’s some teaser slides!
-
-
I created a munin plugin to chart the number of gears present/idle on OpenShift application node instances. The plugin was written for/tested against OpenShift Enterprise 1.2.
Chart: One Host

These charts show the number of gears present/idle on a single OpenShift application node instance. Nothing special required to set this plugin up. Just copy the script/configuration to your node and then restart the munin-node service.
Chart: District

This is a combined/multigraph chart showing the number of gears present on all nodes representing my “small” district. This chart is created using the munin concept of ‘loaning’ data.
GitHub: openshift-munin-plugins
Interested in trying it out yourself? The code is up on github: tbielawa/openshift-munin-plugins.
Along with the actual plugin you can find example munin server configs for creating the multigraph chart of gears across all nodes in a district.
-
Update 2013-06-23:
Updating to the 0.3.4 version of dblatex has fixed many of the issues detailed in The Aftermath (end of this blog post). See the blog post for more information.
The Problem:
You’re writing a book in DocBook XML, publishing it with dblatex, and you dislike (or want to customize) the fonts it uses in the rendered PDF.
You hunt around the internet and find a nice family of fonts you want to use in your final product. Best of all, they’re free and released under the Open Font License!(Thanks, Adobe!)
The dblatex documentation shows you how to set your fonts, but you can’t seem to get it to work.
- What do you put in for the names anyway?
- Do spaces matter, or do you enter file names?
- Where do you install the fonts?
- OTF, TTF? What type of font must they be?
- Does the TeX engine even support this?
The Solution:
1. Find The Family Names
Caveat: I can verify that this solution works for TTF type fonts, I can not comment on how well it works for other font types.
First, you will need to identify the actual family name of the fonts you want to use. If your font is not installed on your system there is a command called otfinfo that can tell you the family of the font file (despite sounding specific to OTF fonts, this works on TTFs as well). The otfinfo command is provided by the lcdf-typetools package:
If your desired font is already installed on your system you can use the fc-list command instead to find the same information (fc-list is provided by the fontconfig package):
2. Install New Font Files
If this is a new font on your system then you’ll need to install it. There are (at least) two locations that work:
$HOME/.fonts/usr/share/fonts/truetype/
The Font Manager application (package: font-manager) also provides a graphical way to install font collections.
(Optional) Rebuild Font Cache
Rebuild your font caches with the
fc-cache -f -vcommand. If I recall correctly, you need to have super user permissions to run this. I may be wrong though.3. Configure dblatex
The necessary changes to consume your custom fonts isn’t difficult. Assume that up until now you’ve been rendering your PDFs from XML source like this:
dblatex -o output/Virtual-Disk-Operations.pdf Virtual-Disk-Operations.xml
We need to use XSLT stylesheets to define what our chosen font families are going to be. In this example I’m using Source Sans Pro for the body font and Source Code Pro for monospaced sequences.
First, make a directory called xsl and put a file like this in it:
Next, slightly modify the command you run to build your PDFs (new parts are in bold text):
dblatex -p xsl/dblatex-pdf.xsl -b xetex -o output/Virtual-Disk-Operations.pdf Virtual-Disk-Operations.xml
-p xsl/dblatex-pdf.xsl: This tells dblatex that we’re providing a “user stylesheet” to use when transforming the XML. This stylesheet only has our font customizations in it, but you can put much more in them than just that.
-b xetex: This tells dblatex that instead of rendering our PDF with pdftex we want to use a different backend driver (or “TeX engine”). Specifically we want to use the xetex driver. We choose the xetex driver because of it’s superior font handling abilities via the fontspec LaTeX package. When we use the xetex engine dblatex will insert some special macros into the intermediate LaTeX document it generates, this process is transparent to the end user:
After this, dblatex runs any custom post-compilation scripts, and then hands the intermediate file off to xetex where it is finally transformed into PDF format.
4. The Aftermath
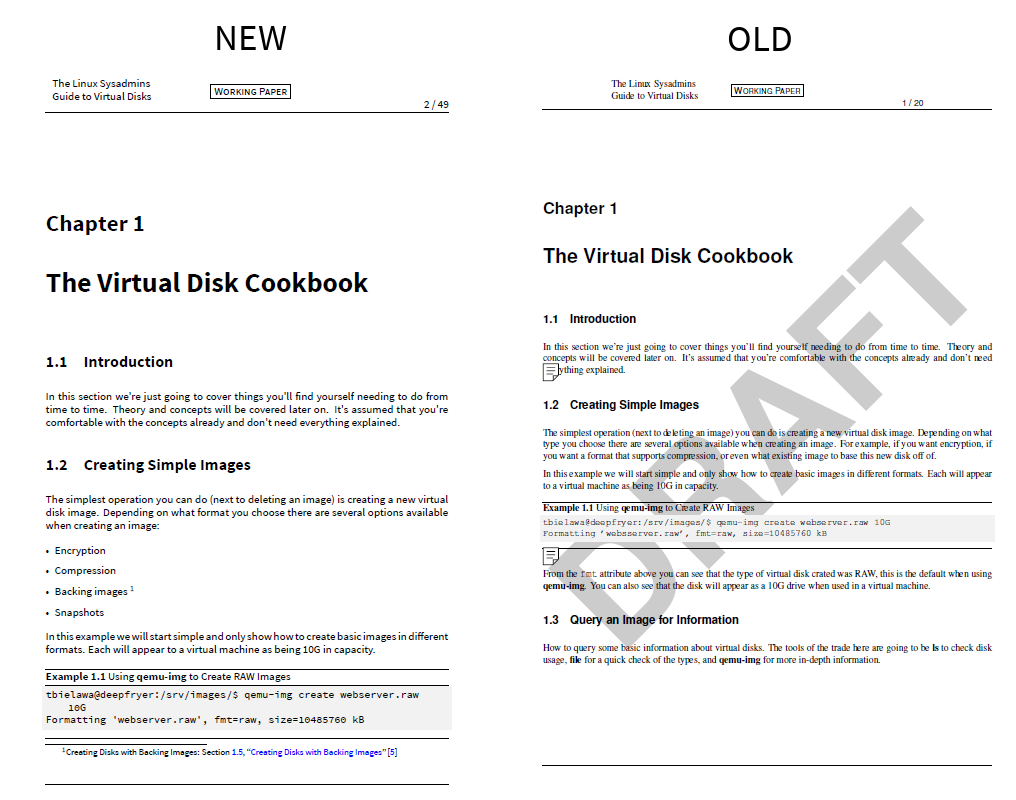
In my case there were some unexpected side-effects from switching backends. Here’s what I’ve noticed so far:
- remark elements no longer appear in PDF output
- The DRAFT watermark no longer appears
- screen elements no longer show a ‘wrapping character’ in long lines

On the left is the book rendered with xetex and the new fonts. On the right is the book rendered with pdftex and no special font customizations.
The only thing that really bothers me is the broken word-wrapping character. I can deal with the others breaking. I had intended to remove them from the final product anyway.
-
Documentation for Setting up an OpenGL project using Apple Xcode has been updated for Xcode 4.2.5.
I got an email earlier this afternoon from someone seeking help on the topic and promptly updated it to go along with Xcode’s new interface. I’ve also added new sample code from a texture project I did at the university to help adequately test the set up.
Side note: I was not aware how high the doc was on google search results!
-
Spotify is pretty damn cool. I think we can all agree on this. What’s even cooler (if you’re an Open Source/Linux geek) is running a third-party ncurses client to connect to Spotify. Here’s what I had to do on Fedora 17 (64 bit).
- Install the necessary packages to checkout and build the application
- Per the Open Grieves instructions, install the following packages:
subversion libtool libogg-devel libvorbis-devel pulseaudio-libs pulseaudio-libs-devel zlib-devel gstreamer-devel libao-devel openssl-devel ncurses-devel
- Per the Open Grieves instructions, install the following packages:
- Checkout the despotify source code from SVN
svn co https://despotify.svn.sourceforge.net/svnroot/despotify despotify
- Move into the
despotify/srcdirectorycd despotify/src
- Build and install the application
makesudo make install
- Because we’re specifically talking about an x64 installation we need to fix how
libdespotify.so.0got installed. Now, I’m sure there’s a more intelligent way to do this (please tell me if you know by commenting on this blog post, or hit me up on twitter: @tbielawa), but lacking the necessary knowledge, I opted use symbolic links (note: this fixes the “despotify: error while loading shared libraries: libdespotify.so.0:" cannot openerror message you may be seeing)cd /usr/lib64sudo ln -s ../lib/libdespotify.so.0
- Run the application (protip: Press the “
?” key to see a list of shortcuts.ctrl+eis a shortcut for:connect)despotify
- If you try and log in now you’re most likely going to receive a “
User not found” error message. Per the information in this thread on the archlinux forumsI did the following:- Logged into the Spotify web interface
- Went into the “Edit Profile” page
- Went to the “Set a password for your devices” page
- This page will give you a number you will use as your despotify user name, save it somewhere for the next step. Click the link/button to receive an email which allows you to set the password for this account
- Read said email, click link in email, set “device” account password
- Now, using the account credentials created in the last step, you can log into the despotify application
That’s everything I had to do. So, is it worth it? No. Not really. But it was a fun little experiment/challenge.
The interface is immature, at best. It’s lacking most/all of the functionality I really enjoy in the official Spotify client, such as creating and listening to artist/song based radios, receiving/sending music suggestions to friends, Starring songs for offline listening later, etc…
What you can do is search for artists/tracks and play the results, and, impress your friends? I guess. (probably not though)
- Install the necessary packages to checkout and build the application
-
-


![]()
Technitribe by Tim Bielawa is licensed under a Creative Commons Attribution-ShareAlike 4.0 International License.